- Log in to ev3dev
- Configure code synchronization
- Running the code
- Enabling autocomplete and error checking
- Using the power of the IDE
- Additional features for the PyCharm Professional version
This tutorial shows how to set up a nice working environment for developing Python programs on ev3dev using the PyCharm IDE.
For this tutorial, we will assume you have flashed an SD card, booted from it, and configured networking on your device. These steps are explained in the Getting Started guide.
Log in to ev3dev
We’ll need to be able to run terminal commands on the EV3 for this guide. To set this up, head over to our SSH tutorial.
Configure code synchronization
The first half of this tutorial assumes you are using the free “Community” version of PyCharm. However, if you have access to the “Professional” version of PyCharm, which is free for students and some other special circumstances, we recommend that you read through the PyCharm Professional version alternatives shown later.
The goal is to be able to transfer code as you write it to the EV3 or other ev3dev device with as few clicks as possible. To do this, we are going to be using a program called git. Git is a “version control” system generally used to store source code. However, it works well for us as an easy way to transfer code to a remote machine with tools built into PyCharm.
Configuring a host repo on the ev3dev device
To get started, open the SSH terminal that you set up previously and run the following commands (make sure to replace the name/email with your own):
sudo apt-get update
sudo apt-get install git
git config --global user.email "you@example.com"
git config --global user.name "Your Name"
Now let’s make a new project using our versioning system. Just type:
mkdir myproject.git
git init --bare myproject.git
mkdir myproject
If you’d like to call your project something different, you can replace
instances of myproject with your own name. Make sure it doesn’t contain spaces
or other special characters.
Yay! Git is initialized in the new folder we created. We have a new project repository. Now we can clone this repository on our development machine, but first we need to do a little more configuring, to automatically deploy our code when we push it back to the ev3dev brick.
nano myproject.git/hooks/post-receive
Add the following lines to the file you just opened. If you need some tips on using nano, check out our nano cheat sheet.
#!/bin/sh
git --work-tree=/home/robot/myproject --git-dir=/home/robot/myproject.git checkout -f
Finally, do:
chmod +x myproject.git/hooks/post-receive
Configuring synchronization in PyCharm
This tutorial focuses on PyCharm Community Edition (although these instructions also work for more advanced versions of the software). If you haven’t already, install PyCharm.
What we are going to do now is make a clone of the project that we created on
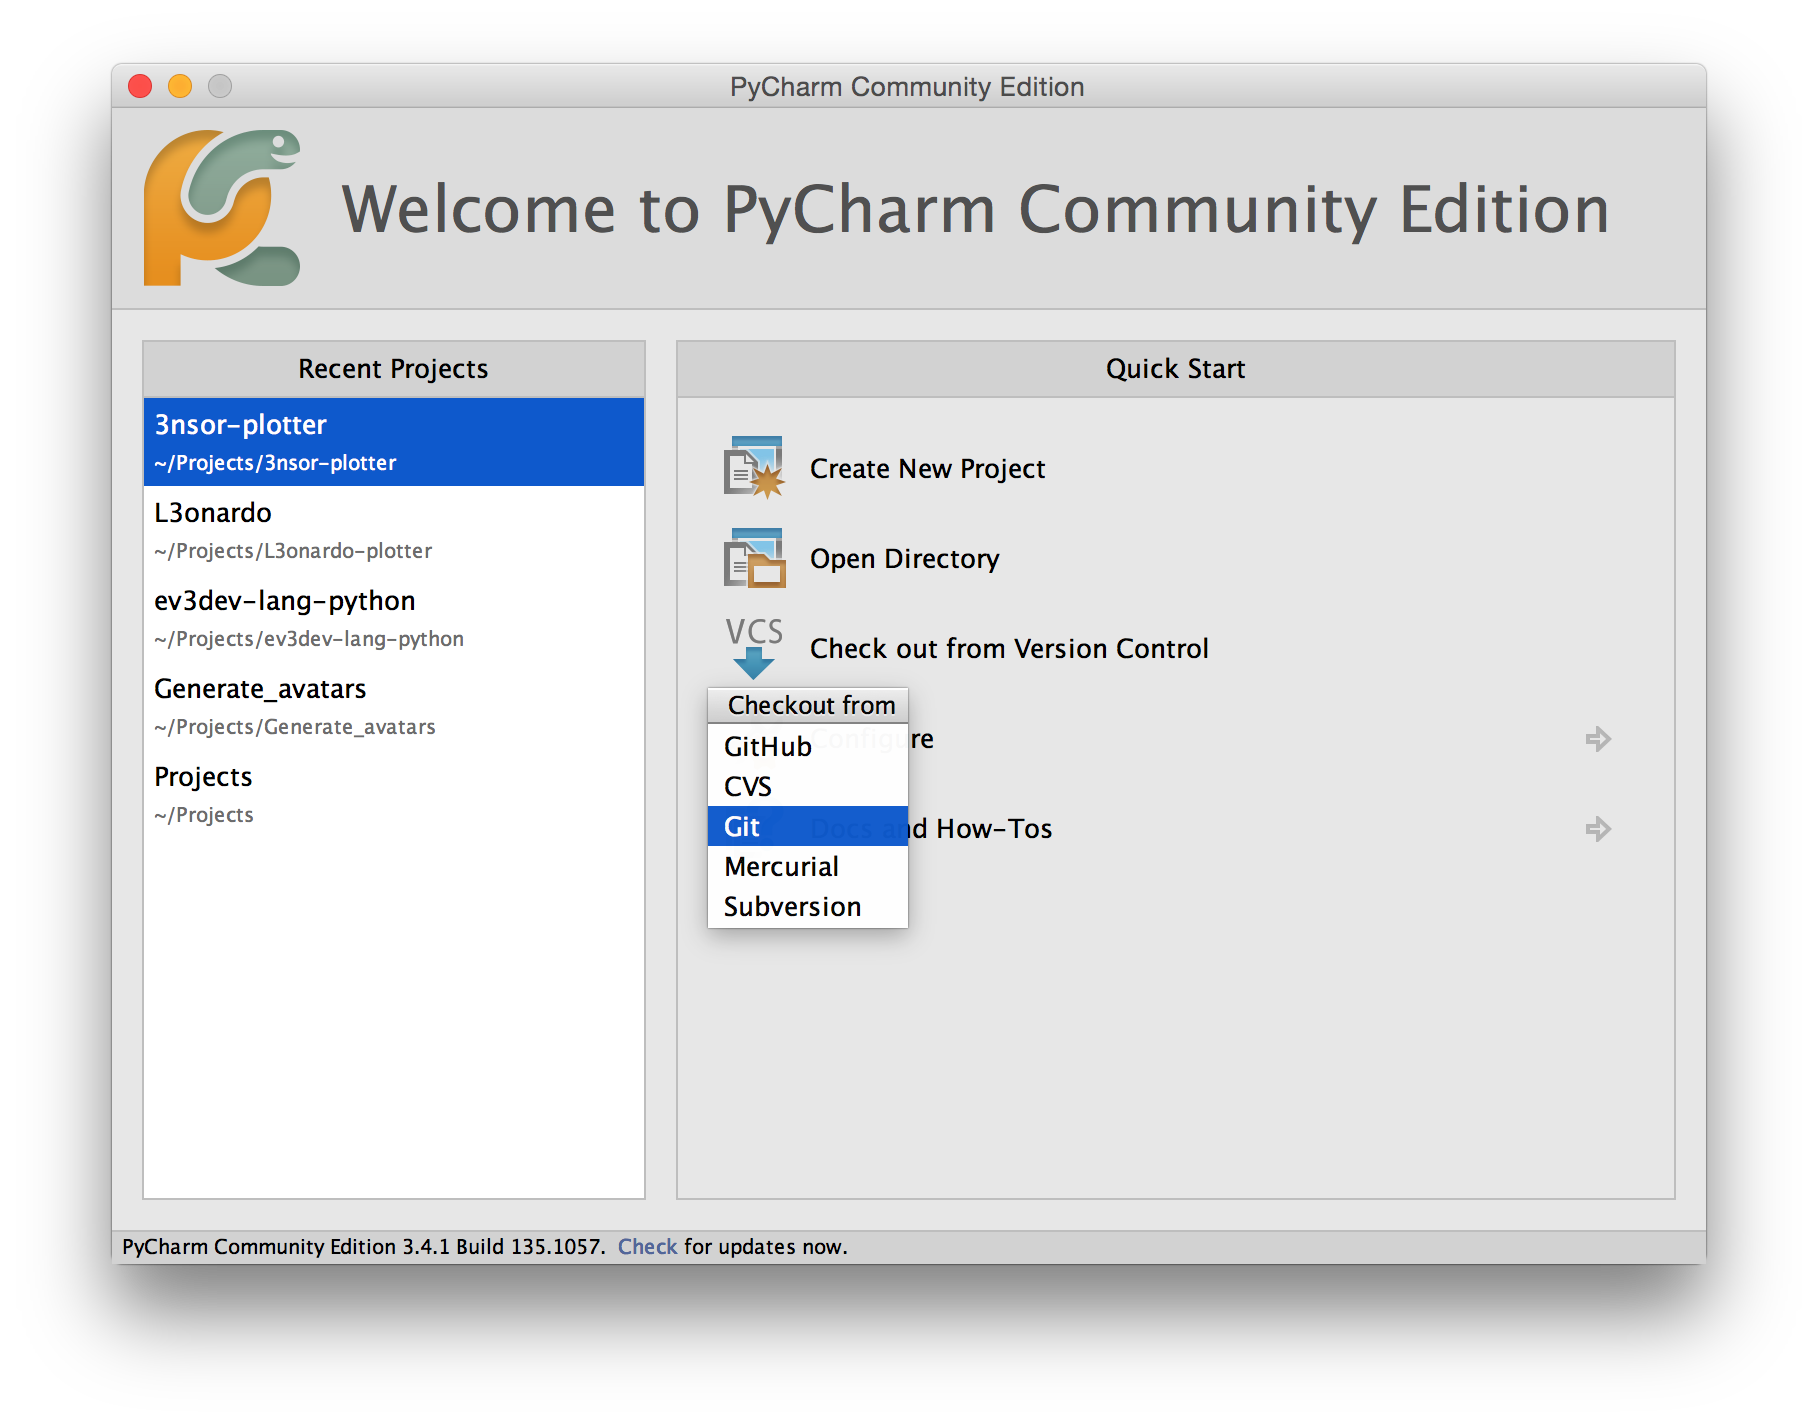
the ev3dev machine so we can work on it on the development PC. In the Welcome
dialog of PyCharm, choose: Checkout from version control > Git.
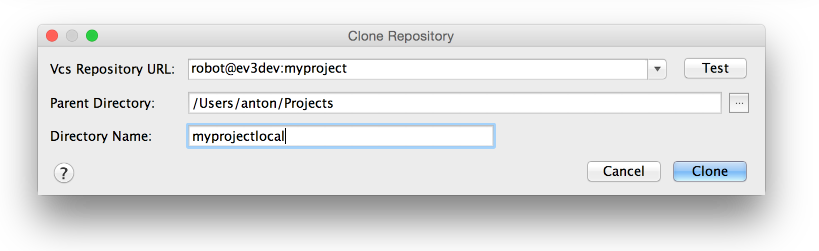
Now type the hostname of the ev3dev machine (which is usually going to be
ev3dev or ev3dev.local), followed by a colon and then the project name. In
the other fields choose a nice parent and project directory.
If all goes well you should end up with a new PyCharm window open to your new empty project. If the ‘testing’ dialog stays on screen for a long time, it might be that your PyCharm master password is needed for your PyCharm password storage. Cancel the checkout, type the master password and try again.
Adding some code
Let’s add some code to this project. Right-click on the ‘myproject’ folder in
the left column and choose new > python file. Name it run_motor. PyCharm
will ask if you want to add it to git; we’re using git to synchronize code to
the brick, so we want this enabled. Choose Yes.
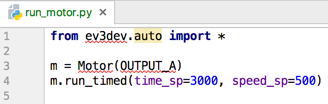
Now add the following test code:
from ev3dev.auto import *
import time

m = Motor(OUTPUT_A)
m.run_timed(time_sp=3000, speed_sp=500)
Once you have entered that code, choose VCS > Commit Changes… or press Ctrl+K (Cmd+K on Mac).
The commit message is intended to be used to describe the changes you made to your code. That’s
handy later on when you begin making lots of changes, but for now you can just type first commit.
Now mouse over the commit button and choose “commit and push” from the dropdown.
In the next dialog make sure to select the “alternative branch” checkbox
and click “Push”. Voila! Our code has been sent to the ev3dev brick. Let’s take
a look.
Running the code
It’s time to run the code we wrote earlier. It tries to run a motor, so plug one into port A on your brick. Now you’ll need to open the SSH session you have from earlier (or a new one) and run the following commands:
cd myproject
python3 run_motor.py
Watch the motor that you attached. If your code runs properly, you should see the motor spin for three seconds.
Enabling autocomplete and error checking
While saving the code we used earlier, you may have noticed a problem: PyCharm puts red curly lines under the ev3dev library’s import line.
This is because the ev3dev library is missing on the development machine and as a result PyCharm believes your code is referencing nonexistent classes. We can fix this issue by installing the ev3dev library on the development PC: we won’t be able to run motors on the desktop of course, but the documentation and autocomplete will be detected in the library so that PyCharm can help you out.
On your host computer install the ev3dev-python library using Python’s built-in package manager pip.
pip3 install python-ev3dev
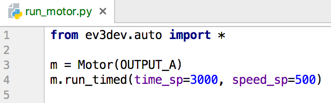
Once you have installed the library the red curly lines will go away and autocomplete will work for ev3dev-python commands (very handy).
Using the power of the IDE
With the IDE (PyCharm) set up and the library installed you can code much
faster. PyCharm will highlight most coding errors and typos. It will also
suggest to autocomplete your code and show documentation. You can start
typing m. and PyCharm will suggest all possible methods and properties.
Choose one. Now you can put your cursor inside the property and press F1 to
see the docs. Or press cmd/control-down arrow to look inside the library where this
property is defined. Neat, huh? Happy coding.
Additional features for the PyCharm Professional version
The Professional version of PyCharm (which can be obtained for free for educational institutions and top contributors to open-source projects) has a few more features to make your development experience much smoother. If you are a student or teacher, register your valid institutional email address on the JetBrains student application page to apply for the free version of PyCharm professional. If you are an open source developer who contributes heavily to an existing project, you can visit the JetBrains Open Source license page to see if you qualify for a free version of PyCharm professional.
Here is a list of the tools you can use with PyCharm professional to make your Python development easier.
| Tool | Purpose |
|---|---|
| SFTP Remote Server | An alternative to the approach used above to transfer files from your host computer to the EV3 pretty instantly when the file is saved on your host computer. |
| SSH Terminal | Lets you make the SSH connection directly within PyCharm instead of using a separate tool (like PuTTY). |
| Remote Interpreter | Let’s you avoid needing an SSH terminal since you just hit play within PyCharm to run programs. Allows debugging, logs, etc. all within your host computer PyCharm IDE (but it can be SLOW!) |
With these tools and installing ev3dev-lang-python on your host computer, you can really make the Python development process pretty user friendly.
Setting up an SFTP Remote Server
This is an alternative to the git post-receive hook solution that was shown earlier in this tutorial. If you have access to the Professional version of PyCharm, then this solution is a bit more elegant than the solution shown earlier. It works about the same in that it instantly transfers files, but it also allows you to have some other git remote (say GitHub) instead of using the EV3 as your git remote. Here are the steps necessary to set up your file transfer mechanism using a PyCharm Remote Server.
- Within PyCharm choose File > Settings for Windows and Linux (or PyCharm > Preferences for macOS)
- Expand Build, Execution, Deployment
- Click Deployment
- Click the
+icon to add a new remote server, name it whatever you like (EV3for example)
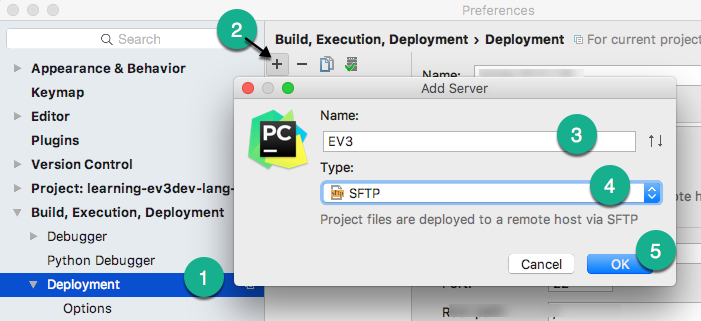
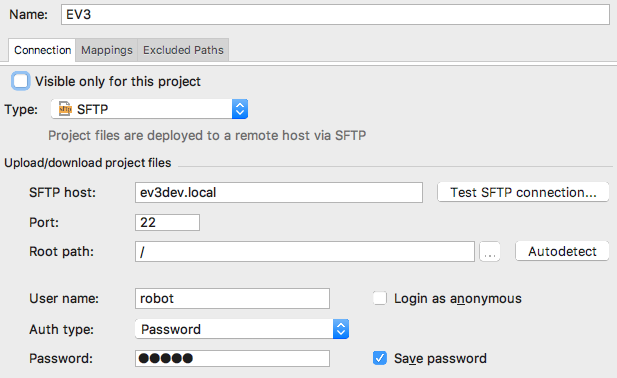
- Select SFTP, then set the following parameters:
- SFTP host:
ev3devorev3dev.local, depending on your network configuration (this will be different if you have renamed the EV3) - Port: 22 (don’t change it)
- Root path: / (don’t bother change it as we’ll set the full path later)
- User name:
robot - Password:
maker(this is the default password; if you have changed it, use your own) - Save password: Check the box to make it easier on yourself.
- You can also uncheck ‘Visible only for this project’ at the top.
- SFTP host:
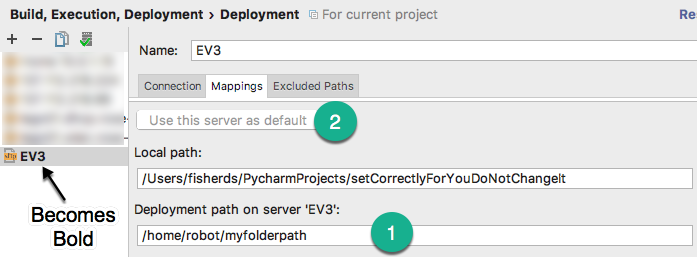
- Click the Mappings tab (if blank, hit OK the come back to this spot, sometimes it requires you to save it first)
- Select the path for your files on the EV3, for example:
- Deployment path on server:
/home/robot/myfolderpath
- Deployment path on server:
- Click the button at the top that says
Use this server as default - Hit OK
- Select the path for your files on the EV3, for example:
- Reopen the File > Settings for Windows and Linux (or PyCharm > Preferences for macOS) area (note we had to save the earlier step first)
- Expand Build, Execution, Deployment, expand Deployment, then select Options
- For
Upload changed files automatically to the default server, selectOn explicit save action

You can test this setup without executing any code. Just make a change, save the file, and see if the file is in sync on your EV3. Note, in order to run that test you need an SSH terminal, which you can also do from within PyCharm (see next instruction).
Setting up an SSH Terminal within PyCharm
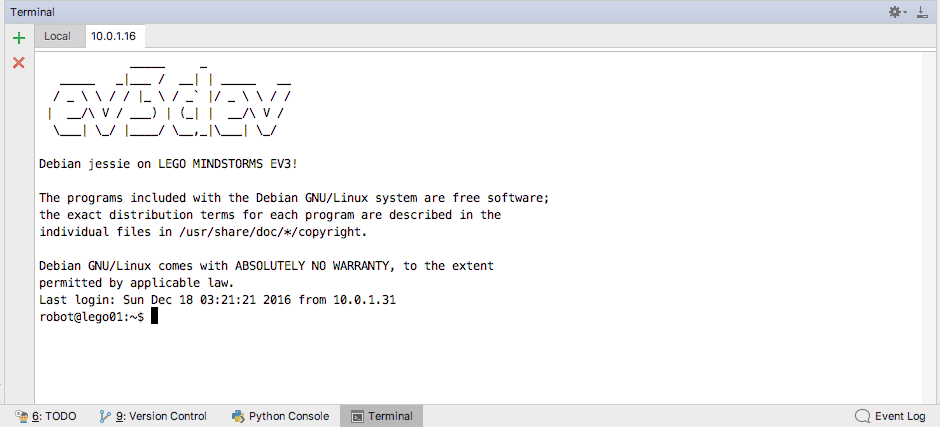
This tool is really just a convenience. Instead of using a separate program, like PuTTY, MobaXterm, or a Mac Terminal, just do it from within PyCharm. To start an SSH session just use the menu option Tools > Start SSH Session…
It will prompt you for what remote server you want to use. Select EV3 (if you named it that). Next it will have a dialog that says “Connecting to Remote Host … Are you sure?”, click Yes. Then an SSH connection to your EV3 will open in a new Terminal tab.
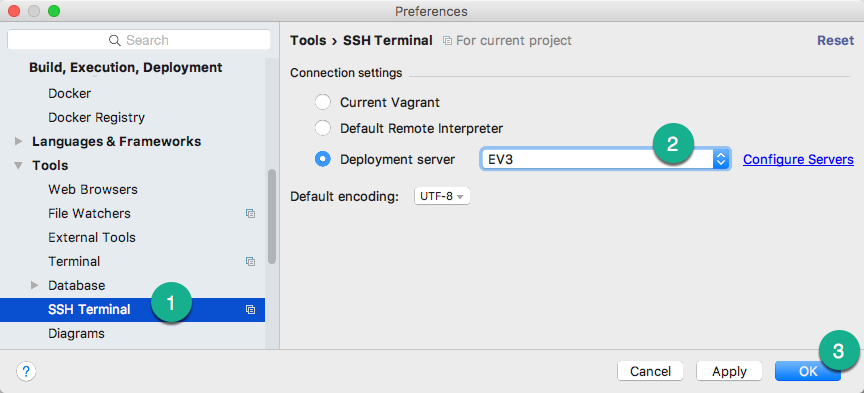
You can even skip that selection step (saves 1 click!) by setting the default Deployment server.
- Choose File > Settings for Windows and Linux (or PyCharm > Preferences for macOS)
- Expand Tools
- Select SSH Terminal
- Change Deployment server from
Select server on every runto your configured server (for exampleEV3if you named it that)
Setting up a Remote Interpreter
This step is optional. You already have an SSH terminal in PyCharm to run your
program. However wouldn’t it be nice to just be able to hit the PyCharm run
button instead of typing python3 filename.py in the SSH terminal? It’d feel
like the program was just running on your own computer. This is, theoretically,
possible in Pycharm; however, it has some serious issues.
In my testing, on a real EV3, this approach was so slow it was unusable (perhaps an RPi would work better). You can try it out. Maybe you’ll have better luck.
- Choose File > Settings for Windows and Linux (or PyCharm > Preferences for macOS)
- Expand your project
- Select
Python Interpreter - Click the three little dots to add a new interpreter and select Add Remote
- Select SSH Credentials
- Add the host, username, and password just like you did for the Remote Server setup steps above
- Change the Python interpreter path to
/usr/bin/python3
Once set up, PyCharm will install some helper info to the ev3, and will index the existing files on the ev3 which takes a long time (2-3 minutes), so you can do something else for a little while. When it’s done you can use the PyCharm IDE play button to run your code on ev3. It’s a pretty slick idea if it worked better. Good luck!
