- Why Do It?
- How To Do It - Linux
- How To Do It - Windows
- How To Do It - OS X
- How To Do It - EV3
- References
Why Do It?
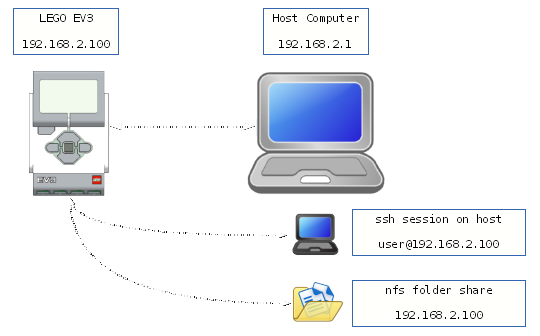
If you quickly want to change a little code and then run it on the robot, it’s nice to have a file shared between your development pc and the ev3dev robot. That’s what this tutorial accomplishes with NFS. It’s also a fast and easy way to tune parameters or access log files.
This requires editing some config files and getting addresses and filenames straight. For more advanced users.
The NFS protocol is the standard Linux way to share files between computers, and since you’re running Linux on the EV3, and there’s nfs support built-in, you can share files between your computer and the EV3.
More uses for a shared folder:
- Loading and unloading modules that are under development. That saves time and is less error prone than swapping SD Cards and rebooting all the time.
- Upgrade your SD Cards with known good modules, new kernel
uImagefiles, and other updates to config files. - Backup your SD card.
- Edit files on your host machine, then run them on the EV3 without having to actually copy files anywhere!
The instructions here are for all three platforms Linux, Windows, and OSX - just pick the one you need
How To Do It - Linux
On your Linux box, you’ll need to edit a file called /etc/exports. If you don’t have this file, then you need to install nfs-common or a similar package. (If that doesn’t work and/or you already have nfs-common installed, install nfs-kernel-server. Some devices, like the Raspberry Pi, don’t have it installed by default. IMPORTANT: If installing nfs-kernel-server, before install create the target directories (home/youruserid/nfs/ev3dev). Otherwise, the service will fail to start.)
Open the file and add the following line:
/home/youruserid/nfs/ev3dev 192.168.254.*(rw,sync,no_subtree_check,root_squash)
All you need to do is tell nfs which directory you want to share (/home/youruserid/nfs/ev3dev) and who you want to share it with (192.168.254.*).
Note that 192.168.254.* is my personal wifi subnet. For those of you that are trying to set up nfs over USB Ethernet, the default subnet that ev3dev expects is 192.168.2.*.
The options, enclosed in parenthesis, tell nfs to:
- Allow read/write access
- Don’t process a write request until the previous write is committed to disk
- Disables subtree checks, more reliable but mild security risk
- Do not let root on the EV3 to be like root on the host, good idea!
So update the file on your host machine, then run sudo exportfs -rv which will update the directories that nfs exports.
Now update the fstab on the EV3 (see below).
How To Do It - Windows
Download and Extract WinNFSd. You will have a folder with an executable, license, and readme file. Open notepad, and enter this line.
winnfsd.exe -id 0 0 -log off [directory]
Where [directory] is the full path to the folder as it shows in the file explorer. For example, mine is
winnfsd.exe -id 0 0 -log off E:\Users\James\Dropbox\ev3dev
Save it as all files, name it launch.bat
Now launch launch.bat and the server is running.
Time to update the fstab on the EV3 (see below).
How To Do It - OS X
Setting up an NFS share on a Mac running 10.5 (Leopard) or later is very similar to setting it up in Linux.
On your Mac, simply edit (or create) the /etc/exports file (as root), adding a line for each path on your Mac that you wish to share. Here’s a simple example:
#/etc/exports
/path/to/shared/folder                    -network 192.168.0.0 -mask 255.255.0.0
/path/to/read_only/shared/folder -ro      -network 192.168.0.0 -mask 255.255.0.0
/path/to/shared/tree             -alldirs -network 192.168.0.0 -mask 255.255.0.0
The -network and -mask options limit access to the shared directory to those on the 192.168 subnet. The -ro option limits access to read-only, while the -alldirs option provides access to all subdirectories of the specified path.
For this example, I’m going to share the Public folder under my userid (of course your userid will be different) and the subnet will be 192.168.2.0 for the case of the USB over Ethernet connection.
#/etc/exports
/Users/youruserid/Public -maproot=root:wheel -network 192.168.2.0 -mask 255.255.255.0
Wait, what’s that goofy -maproot=root:wheel doing there? Well, it’s the little hint that Barry has on his page that maps the nfs client’s root user to the root user on the OSX host, and it also maps the root group to the OSX wheel group. Because BSD has to be, you know, different!
After creating the file, the nfsd daemon should automatically start up. If necessary it can be enabled permanently using nfsd enable. You can check to see if it’s working with showmount -e, which will give you a list of the active NFS shares, like this:
Exports list on localhost:
/Users/youruserid/Public                     192.168.2.0
If you make changes to /etc/exports, activate them with nfsd update.
How To Do It - EV3
On the client - ev3dev - side, we need to create, test and enable a systemd systemd.mount file in order to mount our newly created NFS share.
The classic way of mounting the NFS share via an entry in /etc/fstab does not work! It can cause ev3dev to hang during boot up.
First off, we need to create our systemd.mount file. This file needs to be named after the directory where we want to mount our NSF share, with the slashes replaced by hyphens. For this tutorial, we will mount the NFS share at /home/robot/nfsshare/ - feel free to change this to suit your needs.
Create and open the file /etc/systemd/system/home-robot-nfsshare.mount. Add the following sections:
[Unit]
Description=Mount an nfs share
After=network.target

[Mount]
What=192.168.0.10:/path/to/shared/folder
Where=/home/robot/nfsshare
Type=nfs

[Install]
WantedBy=multi-user.target
The [Unit] section provides a general description of the systemd unit file we have just created. The After=network.target line tells systemd to only attempt to mount this after a network connection has been established.
The [Mount] section describes what to mount where. For the What= line, replace 192.168.0.10 with the IP addres of the computer on which you configured your NFS share and /path/to/shared/folder with the folder you have configured to be shared. As stated above, /home/robot/nfsshare is the path where we want to mount the NFS share.
The [Install] section describes, when to start this unit after it has been enabled. WantedBy=multi-user.target means that this file will be executed after the system is ready for a user to log in.
In order to mount the NFS share, you first need to reload the systemd daemon:
sudo systemctl daemon-reload
Then, we need to start the mount unit we have just created:
sudo systemctl start home-robot-nfsshare.mount
To verify that everything worked, look into the /home/robot/nfsshare directory and check that the files from your NFS share are there. Note: The directory /home/robot/nfsshare should have been created automatically.
If you want your NFS share to be mounted at boot, you need to enable the mount unit by typing:
sudo systemctl enable home-robot-nfsshare.mount
References
- OS X Server: How to configure NFS Exports
- Barry O’Donavan’s NFS Tutorial
- The Linux
exportsmanpage - The Linux
exportfsmanpage - The OS X
exportsmanpage - The OS X
nfsdmanpage - The OS X
showmountmanpage
