Intro
Both versions of the Pixy camera, Pixy and Pixy2, are available in a special LEGO version. In this tutorial we explain how to use them on ev3dev and using Python.
General information about Pixy/Pixy2 for LEGO Mindstorms can be found on Charmed Lab’s wiki-page.
On ev3dev there is a difference in using Pixy or Pixy2: ev3dev does contain a driver for Pixy, but not for Pixy2. But it’s easy to use Pixy2 by setting up direct I2C communication between the EV3 and Pixy2. Both methods will be explained. At the end of this tutorial you will find a link to a Github repository containing more detailed information and more examples (including the linetracking functionality of Pixy2).
What you need
- LEGO Mindstorms EV3 running on ev3dev.
- Pixy for LEGO Mindstorms or Pixy2 for LEGO Mindstorms. The camera is connected to the EV3 with the cable delivered with your Pixy or Pixy2.
- The camera comes with its own tool: PixyMon. This tool helps you to set the signatures (objects you want Pixy/Pixy2 to detect). To use this tool you need to connect the camera directly to your PC by using a mini USB cable. When using Pixy, be aware that when PixyMon is running on your PC and the camera is plugged in to your PC, its values are not updated to the EV3. So before starting your script on the EV3 be sure PixyMon is not running! This relates to Pixy only, not to Pixy2!
- To run the scripts from Brickman, be sure it’s executable. To make it
executable run
chmod +x <file>once in the terminal. Also don’t forget the shebang#!/usr/bin/env python3in the first line of your script. - When running the scripts in this tutorial from an SSH-terminal, run the script
with the command
brickrun -- python3 your-sript.py. Reason is thatbrickrunwill take care of switching between consoles to prevent the userinterface of Brickman to reappear at any time when your script is running.
Using Pixy for LEGO Mindstorms
In python use the Sensor class to connect to the Pixy camera:
from time import sleep

from ev3dev2.sensor import Sensor, INPUT_1
from ev3dev2.port import LegoPort


# Set LEGO port for Pixy on input port 1
in1 = LegoPort(INPUT_1)
in1.mode = 'auto'
# Wait 2 secs for the port to get ready
sleep(2)

# Connect Pixy camera
pixy = Sensor(INPUT_1)
In this example it is assumed the camera is connected to input port 1. Next set the mode for the camera:
# Set mode to detect signature 1 only
pixy.mode = 'SIG1'
The Pixy camera has the following modes:
-
ALL: the camera searches for all signatures you’ve set for it. -
SIGn: the camera searches for signature #n (n=1 to 7).
The data which you retrieve from the camera depends on the camera mode. You can find detailed information on this page. We will explain it to you with a simple example.
When the mode is set to ALL, you can retrieve data as follows:
sig = pixy.value(1)*256 + pixy.value(0) # Signature of largest object
x_centroid = pixy.value(2)    # X-centroid of largest SIG1-object
y_centroid = pixy.value(3)    # Y-centroid of largest SIG1-object
width = pixy.value(4)         # Width of the largest SIG1-object
height = pixy.value(5)        # Height of the largest SIG1-object
When mode is set to one of the signatures (e.g. SIG1), retrieve data
as follows:
count = pixy.value(0)  # The number of objects that match signature 1
x = pixy.value(1)      # X-centroid of the largest SIG1-object
y = pixy.value(2)      # Y-centroid of the largest SIG1-object
w = pixy.value(3)      # Width of the largest SIG1-object
h = pixy.value(4)      # Height of the largest SIG1-object
Example for Pixy - Display detected object on EV3-LCD
#!/usr/bin/env python3
from time import sleep

from ev3dev2.display import Display
from ev3dev2.sensor import Sensor, INPUT_1, INPUT_4
from ev3dev2.sensor.lego import TouchSensor
from ev3dev2.port import LegoPort


# EV3 Display
lcd = Display()

# Connect TouchSensor
ts = TouchSensor(INPUT_4)

# Set LEGO port for Pixy on input port 1
in1 = LegoPort(INPUT_1)
in1.mode = 'auto'
# Wait 2 secs for the port to get ready
sleep(2)

# Connect Pixy camera
pixy = Sensor(INPUT_1)

# Set mode to detect signature 1 only
pixy.mode = 'SIG1'

# Read and display data until TouchSensor is pressed
while not ts.value():
    # Clear EV3 display
    lcd.clear()
    # Read values from Pixy
    x = pixy.value(1)     # X-coordinate of centerpoint of object
    y = pixy.value(2)     # Y-coordinate of centerpoint of object
    w = pixy.value(3)     # Width of rectangle around detected object
    h = pixy.value(4)     # Heigth of rectangle around detected object
    # scale to resolution of EV3 display:
    # Resolution Pixy while color tracking: (255x199)
    # Resolution EV3 display: (178x128)
    x *= 0.7
    y *= 0.6
    w *= 0.7
    h *= 0.6
    # Calculate reactangle to draw on EV3-display
    dx = int(w/2)         # Half of the width of the rectangle
    dy = int(h/2)         # Half of the height of the rectangle
    xa = x - dx           # X-coordinate of top-left corner
    ya = y + dy           # Y-coordinate of the top-left corner
    xb = x + dx           # X-coordinate of bottom-right corner
    yb = y - dy           # Y-coordinate of the bottom-right corner
    # Draw rectangle on display
    lcd.draw.rectangle((xa, ya, xb, yb), fill='black')
    # Update display to show rectangle
    lcd.update()
In this example Pixy is set to mode SIG1. The program continuously reads
data from the camera, until the TouchSensor is pressed. When valid data
is received, the program calculates the size and shape of the bouncing box
of the largest detected SIG1 object. Be aware that the resolution of the
Pixy camera and the resolution of the EV3 display are not the same. Pixy’s
resolution while color tracking is (255x199) and EV3’s resolution is
(178x128). This means you have to scale the values from the Pixy!
To update the bouncing box on the display, first the display needs to be
cleared and then the bouncing box can be redrawn.
This video shows this script running:
Using Pixy2 for LEGO Mindstorms
One important difference with the old Pixy is that you have to use Pixy2
without a driver. An easy way to do this is by using the Python smbus
module for setting up direct I2C communication between the EV3 and
the Pixy2.
First configure Pixy2 to communicate over I2C. For this you can use the
PixyMon tool that comes with Pixy2. Open the configure dialog and click on
the Interface tab.
If you don’t see the Interface tab, you’re probably not running the right firmware on the Pixy2 camera. Be sure to run the stock version, instead of the LEGO version. See Pixy2 documentation how to install firmware.
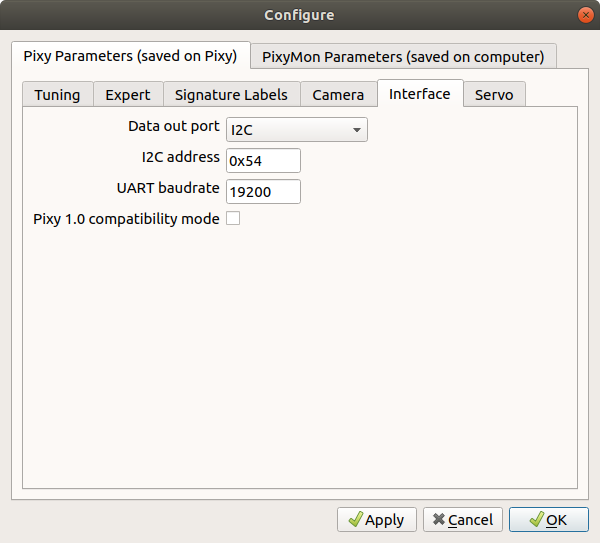
Set Data out port to I2C and I2C address to 0x54 (or any other
address you like).
In your Python script import the module smbus:
from smbus import SMBus
Next set the EV3 input port to other-i2c:
from time import sleep

from ev3dev2.port import LegoPort
from ev3dev2.sensor import INPUT_1

# Set LEGO port for Pixy2 on input port 1
in1 = LegoPort(INPUT_1)
in1.mode = 'other-i2c'
# Short wait for the port to get ready
sleep(0.5)
Define the I2C-bus:
- for
INPUT_1:SMBus(3) - for
INPUT_2:SMBus(4) - for
INPUT_3:SMBus(5) - for
INPUT_4:SMBus(6)
Assume we’re using port 1. Don’t forget to use the same I2C-address as
configured on the Pixy2 (0x54):
 # Settings for I2C (SMBus(3) for INPUT_1)
 bus = SMBus(3)
 address = 0x54
Now everything is set up to request and receive data form Pixy2. You can find the serial protocol on the Pixy2 wiki.
Each request starts with the same two bytes 174, 193. The other bytes depend on the type of request. For instance, when you want to request the firmware version of the camera, your data packet will be (check Pixy2 documentation):
data = [174, 193, 14, 0]
You send this request to the camera as follows:
bus.write_i2c_block_data(address, 0, data)
Now you can read the response:
block = bus.read_i2c_block_data(address, 0, 13)
The first parameter in this read function is the I2C-address of the camera. The second parameter is an offset, which is zero in this case. The third parameter is the number of bytes that the response contains. As you can see in the Pixy2 documentation, the version-request returns 13 bytes. According to the documentation you find the major version in byte 8 and the minor in byte 9:
print('Firmware version: {}.{}\n'.format(str(block[8]), str(block[9])))
Example for Pixy2 - Display detected object on EV3-LCD
This is the same as the previous example, but this time written for Pixy2.
We like to detect objects with signature 1 and display the bouncing box on
the display of the EV3-brick. For this we use getBlocks() to receive
information about the detected object (see Pixy2 documentation).
The data packet for the request is like this:
data = [174, 193, 32, 2, sigs, 1]
Where sigs is the signature or signatures we’re interested in. It is the
sum of all desired signatures. So in case we’re only interested in
signature 1 sigs = 1 and when we’re interested in signatures 1, 2 and 3,
then sigs = 6 (1 + 2 + 3 = 6). In this example sigs = 1. So the request
looks like this:
# Request block
bus.write_i2c_block_data(address, 0, data)
We’re only interested in the largest detected object with signature 1, so the last byte of our data packet has the value 1. To read the response to our request:
# Read block
block = bus.read_i2c_block_data(address, 0, 20)
The response contains 20 bytes, hence the last parameter in
read_i2c_block_data() is 20. Now we can extract the desired data:
x = block[9]*256 + block[8]
y = block[11]*256 + block[10]
w = block[13]*256 + block[12]
h = block[15]*256 + block[14]
With this information we can calculate and display the bouncing box, just like in the example for Pixy. Be aware that the resolution of the Pixy2 camera and the resolution of the EV3 display are not the same. Pixy2’s resolution while color tracking is (316x208) and EV3’s resolution is (178x128). This means you have to scale the values from the Pixy2!
Full code:
#!/usr/bin/env python3
from time import sleep
from smbus import SMBus

from ev3dev2.display import Display
from ev3dev2.sensor import INPUT_1, INPUT_4
from ev3dev2.sensor.lego import TouchSensor
from ev3dev2.port import LegoPort


# EV3 Display
lcd = Display()

# Connect ToucSensor
ts = TouchSensor(INPUT_4)

# Set LEGO port for Pixy2 on input port 1
in1 = LegoPort(INPUT_1)
in1.mode = 'other-i2c'
# Short wait for the port to get ready
sleep(0.5)

# Settings for I2C (SMBus(3) for INPUT_1)
bus = SMBus(3)
# Make sure the same address is set in Pixy2
address = 0x54

# Signatures we're interested in (SIG1)
sigs = 1

# Data for requesting block
data = [174, 193, 32, 2, sigs, 1]

# Read and display data until TouchSensor is pressed
while not ts.value():
    # Clear display
    lcd.clear()
    # Request block
    bus.write_i2c_block_data(address, 0, data)
    # Read block
    block = bus.read_i2c_block_data(address, 0, 20)
    # Extract data
    sig = block[7]*256 + block[6]
    x = block[9]*256 + block[8]
    y = block[11]*256 + block[10]
    w = block[13]*256 + block[12]
    h = block[15]*256 + block[14]
    # Scale to resolution of EV3 display:
    # Resolution Pixy2 while color tracking; (316x208)
    # Resolution EV3 display: (178x128)
    x *= 0.6
    y *= 0.6
    w *= 0.6
    h *= 0.6
    # Calculate rectangle to draw on display
    dx = int(w/2)
    dy = int(h/2)
    xa = x - dx
    ya = y + dy
    xb = x + dx
    yb = y - dy
    # Draw rectangle on display
    lcd.draw.rectangle((xa, ya, xb, yb), fill='black')
    # Update display to how rectangle
    lcd.update()
This video shows this script running:
When using smbus there is one important issue you have to think about:
it is limited to read 32 bytes of data at a time. This is fine for all Pixy2
functionalities, except for linetracking. The linetracking datablock contains
more bytes of data, so you cannot read it completely in once. Therefore,
first read the header bytes, followed by the bytes containing the feature
data, one feature at a time. This is shown in the example on Github.
More info
- There is a GitHub repository where you can find more detailed information and sample code about how to use Pixy and Pixy2 on ev3dev. You can find it here: GitHub KWSmit/Pixy_ev3dev.
- Charmed Lab’s wiki about Pixy/Pixy2: docs.pixycam.com
